Progolas to purchasers and installers:
Thank you very much for choosing our 2115 Type Pergola. Before installation, please read this manual carefully and follow the order and methods specified in this manual. Our company is not responsible for accidents caused by incorrect installation, so please install the product correctly. In addition, please refer to the relevant installation manual for details on the motor and wiring.
Important Notes:
- Customers and installers must strictly follow the instructions in this manual to ensure proper installation of the product. If installers use incorrect installation methods, resulting in the product falling and causing personal injury or other consequences, the customer and installers will be solely responsible for such consequences.
- After opening the box, please confirm that the types and quantities of components inside the box match those shown in the manual.
- Before starting installation, please inspect each component to ensure it is intact and undamaged. If any damage is found, please contact Progolas immediately. If damaged components are installed and the product falls, resulting in personal injury or other consequences, the customer and installation personnel shall bear full responsibility.
Required Tools:

- Gloves
- Hammer
- Safety Helmet
- Tape Measure
- Electric Drill
- Ladder
- Balance Meter
- Balance Ruler
Installation Requirements:

(1) Use a level to check if the construction site is flat.
(2) If there is a height difference on the ground, the drop should be controlled to be less than or equal to 1 cm.
Note: Ensure that the heights of ABCD are consistent, and that the E Surface is on the same plane.

- Note:An elevation difference greater than 1 cm may cause the product to tilt, affecting normal use and potentially resulting in issues such as blades failing to close tightly, motor malfunctions, or excessive noise during operation.
Installation video:
Assembling the side beams:
After ensuring all tools are complete, wearing a safety helmet, and the construction site meets requirements, we first understand what side beams are:
As the primary load-bearing component of the canopy’s perimeter, the side beam supports roof loads (such as wind loads, rain loads, and self-weight), transferring these loads to the columns or foundation to ensure the overall structural stability.
After understanding the side beam, we begin assembling it:

As shown in the figure, first position the side beam and base plate for easy installation.
Note:The distinction between louvers with holes.

After positioning, first install the front and side beams. The installation steps are as follows:
- Remove the base plate from the upright.
- Slide the side beams into the base plate one by one.
- Install the bow-shaped angle brackets.
Note: When sliding in the side beams, remember to insert the L-shaped angle brackets.
Fixing the side beams and columns:
After assembling the main side beams and side beams, we then fix the side beams and columns to form the foundation of the pergola. Since we have already discussed the function of the side beams, we should also discuss the structure and function of the pergola columns:
The columns are vertical load-bearing components that support the overall structure of the pergola. Their main function is to transfer the load from the upper structure to the foundation, ensuring the stability and safety of the pergola.

Alright, back to the main topic. As shown in the figure above, here are the installation methods for securing the side beams to the columns:
- Push the left and right side beams tightly together to eliminate any gaps, then tighten the screws.
- Screws must be driven into the L-shaped brackets at a 45-degree angle.
- Route the motor wires and main light wires properly.
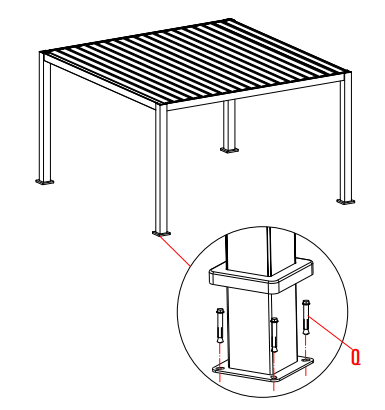
- Ensure the columns are oriented correctly, secure the base plate screws to the columns, and verify the wiring is correct.
Installing the drainage gutter:
After securing the four vertical posts and edge beams, the next step is to install the drainage gutter. I won’t go into detail about the function of the drainage gutter; as the name suggests, it is used for drainage during the rainy season.

The following are the steps for installing the drainage gutter:
- First install the side with louver holes, then install the side without louver holes.
Note: Align the grooves and hang the gutter. - After hanging the gutter, tighten the screws to secure it in place.
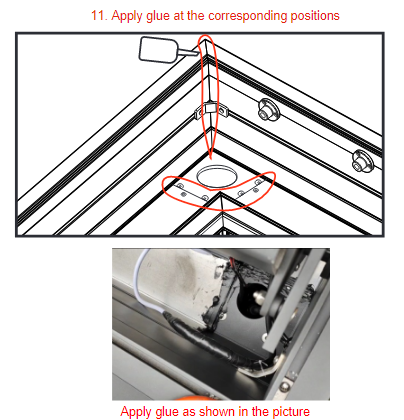
Wiring and gluing:
The purpose of this step is to connect the electric adjustment function and secure the position of the fixed wiring.
10,The following is a diagram of the wiring:

11,The following is a diagram of the glue distribution:

Installing Venetian blind slats:
Venetian blind slats used as the roof of the pergola are one of the distinctive features of the new pergola. People can adjust the angle to control shading, ventilation, and lighting, effectively enhancing spatial comfort and privacy. This is also one of the main differences from traditional pavilions.

12,As shown in the figure, install the louver blades one by one on the edge beam.
Install the push rod:
The function of the push rod is to drive and adjust the opening and closing of the awning or shutter blades, to achieve the mechanical transmission function of angle change or structural movement. This function and the shutter blades can be said to complement each other.


As shown in the upper left image, remove the screws from the push rod and set them aside.
Note: As shown in the upper right image, the push rod is installed on the side with the label!
13,As shown in the figure below: Align the push rod hole with the louver hole, then use the spare screws to secure it. Tighten the screws, but do not lock them.
Install and lock all blades:

14,Install the blade drive end:
Install the louver blades one by one onto the drive structure inside the side beam, ensuring that the blades mesh correctly with the drive gears.
Adjust the push rod connecting rods in the vertical (V) and horizontal (H) directions to ensure that the blade angle can be flexibly adjusted. After installation, check the drive flexibility and smooth opening and closing.
15,Install the fixed end of the slats
Install the other end of the louver slats into the corresponding fixed slots, ensuring that each slat is securely installed and neatly arranged. Check the overall balance to ensure that the slats open and close smoothly without any jamming.
Blade connection:
Next, continue with the wiring, but this time connect the power cord, motor cord, and lighting cord so that you can remotely control the blinds and lighting switches in the future.

16,You can connect the power cord, motor cord, and lighting cord according to the wiring diagram above.
Install the motor:
Almost there! You’re almost done building the 2115 model awning. Next, install the motor. As usual, let’s first talk about its function and importance!
The motor is the core component that drives the automatic opening and closing of the awning’s louvers. It provides stable power to adjust the angle of the louvers and control their opening and closing. It is crucial to the intelligence, convenience, and user experience of the awning.

Note: Before installing the motor, first loosen the screws on the side of the motor and the edge beam.
Next, install the motor properly:(As shown in Figure 1.2)Then lightly lock the accessories on the motorpress the push rod down by hand, and check whether the shutters arefully closed

(As shown in Figure 3)Slide the accessories left and right toalign with the motor screw holes。
(As shown in Figure 4)Finally, lock the accessories and motor
Install the column cover:
Great, we have come to the last step of building the 2115 style pergola, which is to install the column covers. This is very simple. You just need to fix all the column covers and tighten the bolts.

Power on and debug:
Note: Although power-on debugging is very simple, you still need to pay attention to safety protection and protect your own safety!
Daily problems and maintenance:
1. When the sunshade product is loose, please check whether the corresponding screws are loose in time
2. When the sunshade product parts make abnormal sounds, you can add lubricating oil to the correspondingposition. Good maintenance of the awning can extend the life and maintain the appearance. Propermaintenance can make the sunshade product last longer. more complete and more beautiful!
Summarize:
Well, congratulations, you have completed a journey of building a pergola from “zero to one”!
It seems complicated, but it is just a step-by-step process. Tighten the screws, connect the wires, install the louvers neatly, and finally click a few times, and the pergola will stand firm.
Maybe you have already begun to imagine that in the future, sitting under this pergola installed by yourself, drinking coffee and blowing the wind, will you feel a sense of accomplishment?
Don’t forget that installation is important, safety is more important, and maintenance should not be taken lightly. After all, a pergola that can be used for a long time and safely is a real good partner.
If you encounter any problems during the process, remember to find us, Progolas is always here to help you solve it!
2115Type pergola installation FAQ
What should be noted before installing the Progolas 2115 model Pergola?
Before installation, ensure that all parts are complete and undamaged. The installation surface must be level, with a height difference of no more than 1 cm, otherwise it may affect the performance of the pergola.
How to install the louvers of the Progolas Pergola?
The louvers should be installed one by one. First connect the drive end, adjust the push rod, then install the fixed end to ensure smooth opening and closing without any sticking.
What are the steps for installing the Perola motor?
Before installing the motor, loosen the side beam screws, properly position the motor, lightly secure the components, adjust the motor connection to the push rod according to the diagram to ensure the louvers close completely, then tighten all screws.
How should the electric louvers of the pergola be maintained daily?
Regularly check if the screws are loose. If any unusual noises are heard, add lubricating oil promptly. Perform daily cleaning and maintenance to effectively extend the service life of the pergola.
How should the pergolas drainage system be correctly installed?
Install the side with louver holes first, then the side without louver holes. Ensure the slots are aligned, secure the screws after hanging the drainage tray, and ensure smooth drainage.

