
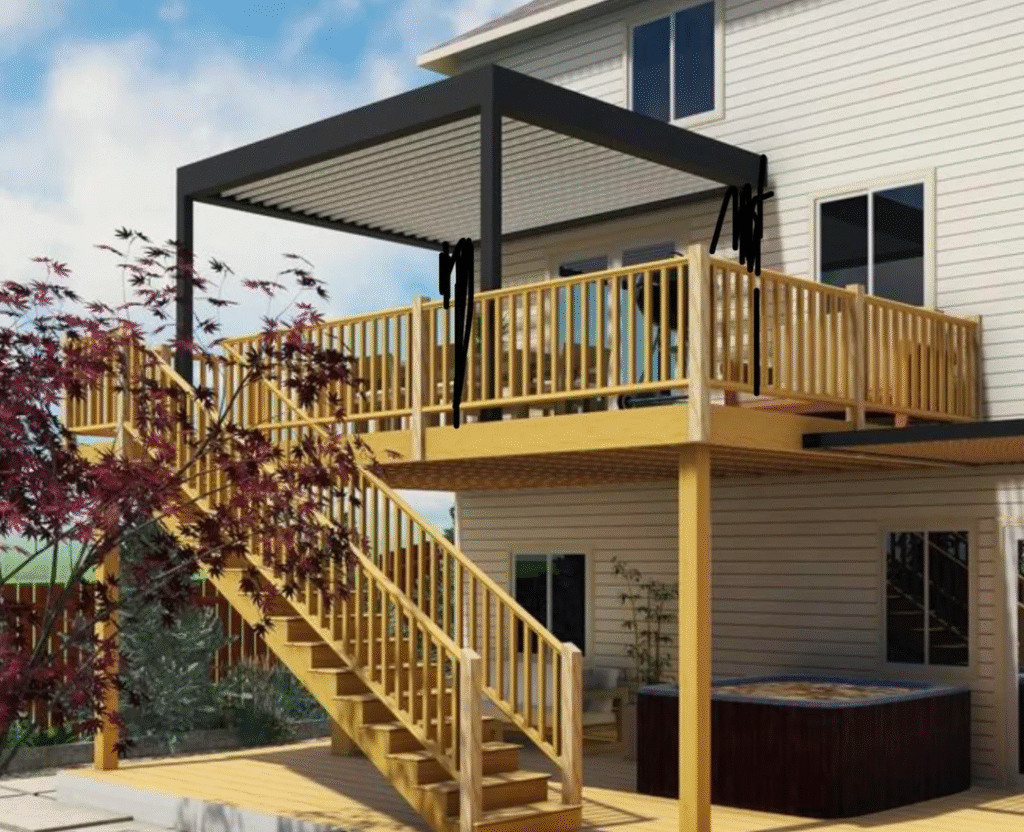

Is It Possible to Install a Pergola on a Raised Deck?

A deck pergola is absolutely feasible and safe when structure connects to structure—that is, the post bases are through-bolted to primary framing (joists/beams) or anchored into a structural slab.
Note: Do not fasten bases to deck boards alone. Waterproof every penetration, design for wind uplift, and verify the deck’s load capacity before you start.
Assessing Capacity (Wood / Metal / Concrete)
Before choosing the look, decide whether your platform can carry the pergola and its accessories (lights, heaters, privacy panels). You’ll also account for wind uplift and lateral forces that try to rack the frame.
Wood deck and pergola
A wood deck and pergola combo can be robust, but only with reinforcement and correct attachment. What that means in practice:
- Through-bolt engineered post bases into joists or beams (never into deck boards alone).
- Add blocking and/or sistered joists beneath each post to create a wide, stiff bearing zone.
- Use backing plates or knife plates where needed, and tighten to the manufacturer’s torque spec.
- Accept routine maintenance: sealing, drainage upkeep, and periodic torque checks.
- For a pergola with wooden deck in wetter climates, specify corrosion-resistant hardware and plan for termite control where relevant.
Industry baseline:
In North America, prescriptive residential decks are commonly designed around ~40 psf (live) + ~10 psf (dead). That’s a starting point, not a promise—verify locally and increase the design target for heavier pergolas or add-ons. See the AWC DCA-6 – Prescriptive Residential Wood Deck Construction Guide for context.
Metal frame deck pergola
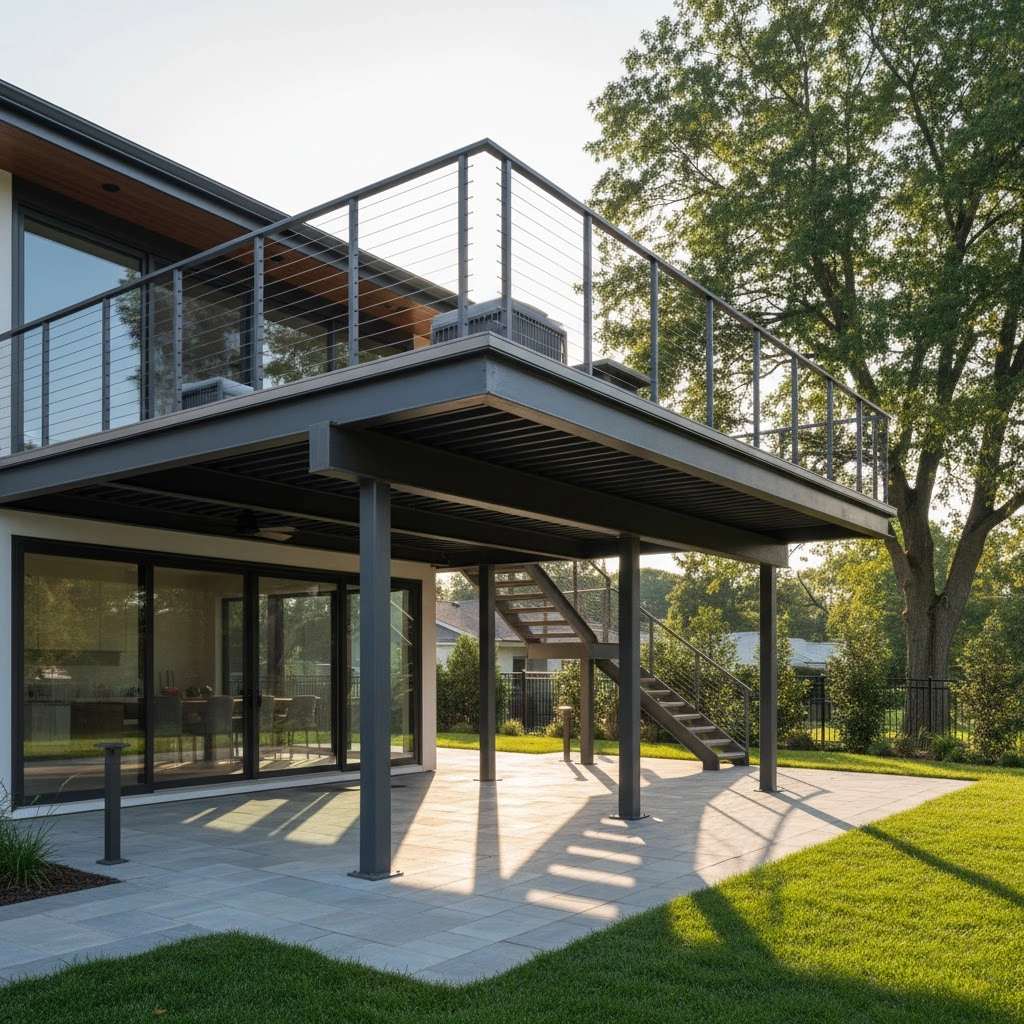
For heavy louvered units or wind-exposed sites, a metal frame supporting a pergola for deck is often ideal:
- High stiffness and predictable connections; less creep over time.
- Finishes like powder coating or anodizing extend durability; add isolation shims to avoid galvanic corrosion if mixing metals.
- Welded or bolted shoes attach to primary steel members per engineering notes.
- Maintenance is mostly inspection and occasional rinse-downs.
Concrete roof/terrace
A concrete slab or roof terrace is also excellent for a deck with pergola (strictly speaking, a slab-mounted pergola):
- Confirm slab thickness and reinforcement, then anchor via cast-in bolts or post-installed anchors (wedge or epoxy) to the engineer’s schedule.
- If your terrace uses porcelain pavers on pedestals, do not anchor to tiles or pedestals; you must tie bases into the structural slab beneath and then restore the finished surface around the base plates.
Anchoring & Waterproofing (Core Methods)
Anchoring
- Use engineered steel post bases/shoes and through-bolts with backing plates to joists/beams, or post-installed anchors into concrete per spec.
- Where possible, align posts directly over beams or doubled joists to shorten load paths and reduce local bending.
- For a pergola attached to deck (vs freestanding), coordinate attachment points so the ledger/primary frame can transfer loads cleanly.
Waterproofing
- Treat every penetration like a roof detail: flashing boots, membrane patches, compatible sealants, and careful fastener sealing.
- Maintain slope and drainage; don’t create a tiny dam around base plates.
- Isolate steel bases from wet surfaces with non-wicking gaskets to reduce corrosion and staining.
(Want the deeper debate on attached vs freestanding? See our guide: Installation method of pergola.)
Tools & Materials (What You’ll Actually Use)

Anchoring & Hardware
- Engineered post bases/steel shoes + manufacturer template
- Through-bolts, structural washers, backing plates; or wedge/epoxy anchors (for concrete)
- Torque wrench (hit spec, then re-check after initial cycles)
Structural & Framing
- Blocking/sister joists, structural screws/bolts (for wood decks)
Layout & Cutting Tools
- Layout tools (tape, laser, strings)
- Drill/driver, diamond hole saw (for tile/porcelain), metal bits
Waterproofing & Electrical
- Flashing boots, membrane patches, compatible sealants, isolation gaskets
- Electrical kit (for motorized units): GFCI, conduit, disconnect, controller, cable glands
Safety & PPE
- PPE and fall protection where applicable
How to Build on a Deck (8 Clear Steps)
1. Stage & plan
Move all components to the deck. Confirm power path (for a motorized roof), control location, and downspout/drain routing. Review the base-plate template and anchor schedule. If you’re building a pergola on a deck in a windy zone, plan temporary bracing.
2. Locate structure
Snap reference lines, square the footprint, and align each post over primary framing (beam or doubled joists). Mark cut lines on the finished surface with masking tape to reduce splintering/chipping.
3. Open the surface
Lift or cut only what you must. Add blocking and/or sistered joists beneath each planned base. If you’re on a roof terrace with tile, core cleanly with a diamond hole saw, then expose the structural slab for anchoring.
4. Set post bases
Install the engineered shoes. On wood framing, through-bolt with backing plates; on concrete slabs, drill and set wedge or epoxy anchors per engineering notes and cure times. Shim only as allowed; verify plumb and elevation.
5. Waterproof penetrations
Install flashing boots and membrane patches where the structure pierces the waterproof layer. Seal fasteners, re-establish slope, and leave clean weep paths. On porcelain systems, restore pedestals or shims around the base plate as needed without trapping water.
6. Erect the frame
Stand posts, set beams in sequence, and torque bolts to spec. Verify diagonals to ensure the rectangle is square; adjust before tightening everything down. This is where a second set of hands (or temporary braces) pays off.
7. Install louvers/motor
Seat louver blades into track grooves and install the drive unit on the long beam. Route wires cleanly, use listed components, and make the GFCI connection per local electrical code. If integrating heaters or screens, add raceways and strain relief now.
8. Commissioning
With the remote, open/close/tilt the roof to confirm limits and smooth travel. Listen for binding. Re-check torque after 24–48 hours and again after the first significant storm. If water runs off integrated gutters, direct it to drains or a splash zone, not across deck joints.
Installation Notes (The Gotchas You’ll Avoid)
Never fasten bases only to deck boards—structure to structure is the rule.
Use through-bolts with backing plates; lag screws alone are not equivalent.
Isolate metal bases from wet surfaces; clean sealant squeeze-out and inspect seasonally.
Wind protocol: lock louvers or retract fabric before storms; add discreet diagonal bracing if the design permits.
For deck pergola kits, follow the manufacturer’s anchoring schedule exactly—don’t “freehand” the base layout or substitute unknown anchors.
Keep a punch list: torque re-check dates, sealant inspection, and drain cleaning.
Weight Planning (Numbers You Can Use)
Because product lines and options vary, no guide can give your exact weight—custom projects especially. As a reference point from our own builds, a 3 m × 4 m louvered unit weighs ~876 lb. Use that to sanity-check the deck zone where the pergola sits.
Design target for the pergola area: 50–60 psf (≈ 250–300 kg/m²).
- This comfortably exceeds many residential assumptions (~40 psf live + ~10 psf dead),
- gives room for add-ons (heaters, screens), and
- accounts for long-term creep.
Cross-check local structural requirements and consider heavier local snow/wind.
First-person factory data:
In our factory QA and field installs, we validate anchor choices using the methodology behind single-anchor tension tests (e.g., ASTM E488/E488M). Deck-board-only fixes fail early by board cracking or screw pull-out, while anchors tied to joists/beams or concrete reach much higher loads before any distress.
Industry reference: AWC DCA-6 (deck loads and detailing context): https://awc.org/publications/dca6/
Terminology refresher: Anchor bolt on Wikipedia: https://en.wikipedia.org/wiki/Anchor_bolt
Permits & HOA (Quick Checklist)
Skip the city-by-city anecdotes and use a universal checklist:
Triggers to check: plan area & height, whether it’s freestanding vs attached, anchoring/foundation type, electrical scope, rooftop location.
Submittals: plan set with dimensions, anchor/base schedule, and, when attached or rooftop, structural calculations. Electrical diagrams where relevant.
HOA / Property rules: materials/finishes, colors, rooftop work windows, visible height, privacy screening.
Good practice: have a licensed contractor or engineer review framing, connections, and wind/snow parameters before ordering long-lead components.
Deck Pergola Ideas & Kits (Design + Practicality)
If you’re collecting pergola ideas for deck layouts, start with function (shade vs views), then proportions (post spacing, beam depth), then detailing (lighting, drainage, privacy). A modern black pergola over a modern wood decking looks sharp and pairs well with warm, low-glare perimeter lighting and a single windward privacy screen.
Deck pergola ideas to consider: corner-post layouts to clear traffic, integrated gutters to control drip lines, and cable-managed heater/speaker runs that don’t dangle.
Deck pergola kits shine on simple rectangles with clear framing beneath; choose custom when you need irregular footprints, heavier wind ratings, integrated AV, or special finishes.
Debating attached vs freestanding? The real driver is framing access—pergola attached to deck options can be elegant, but only when the ledger and primary frame can carry the loads neatly.
Conclusion
A pergola on a deck is only as reliable as its connections and detailing. Keep three principles in focus and you’ll have a deck with pergola that feels like a proper outdoor room for years:
Connect structure to structure. Post bases must tie into joists/beams or a structural slab—never just deck boards.
Waterproof and drain. Every penetration gets a flashing/patch detail; keep slopes and weep paths clear.
Design for wind and life. Size loads honestly, follow torque specs, and apply a simple wind protocol (lock louvers/retract fabric before storms) with periodic inspections.
FAQ
-Can I mount a pergola on a composite deck?
Yes, but the fasteners need to bite into structural framing, not just the composite boards. Composite decking has no more load-bearing capacity than wood, so the same rule applies: through-bolt post bases into joists or beams beneath the surface, never into the boards alone.
-Do I need a permit to install a pergola on a raised deck?
In most U.S. jurisdictions, yes—especially for an attached structure or anything tied into rooftop framing. Permitting typically requires a plan set with dimensions and an anchor schedule, plus structural calculations for attached or rooftop installs. Check with your local building department before ordering.
-How much weight can a raised deck hold for a pergola?
Standard U.S. residential decks are commonly built for about 40 psf live load plus 10 psf dead load, per AWC DCA-6. For the pergola zone specifically, plan for 50-60 psf to leave room for accessories like heaters or screens and account for long-term creep.
-What happens if I only bolt the pergola into the deck boards?
It will eventually fail. Deck boards alone aren’t designed to carry concentrated point loads or resist wind uplift, so screws pull out and boards crack over time. Every post base needs to tie into joists, beams, or a structural slab beneath the surface.
-Should a pergola on a deck be attached or freestanding?
It depends on whether your ledger and primary framing can transfer loads cleanly. Attached pergolas work well when the structure beneath the deck is sound, while freestanding designs avoid tying into the house framing altogether. See our Pergola Installation Method guide for the full comparison.